In this post we will see how to modify and add custom table to Nav connector for Dynamics 365 CRM (also working with Ms Dynamics CRM 2016).
Since Nav 2017 Microsoft decide to integrate a CRM connection system directly in Nav. With this system all data integrations are managed Nav side for both “Nav to CRM” and “CRM to Nav” flow. This system is a simplificatio of older external tool who have to be connected to both Nav and CRM.
An impotant information that can’t be found on Ms posts is that this connector did’nt handle any data deletion. If a record is insert in nav, synchronized in CRM, a delete in Nav will not be repercuted in CRM (or would need some specific developments).
I’m not gonna explain the setup part of the CRM connector, Microsoft documentation is pretty clear about it (only one module to install in CRM and some setup fields to fill) :
https://docs.microsoft.com/en-us/dynamics-nav/how-to-prepare-dynamics-crm-for-integration
https://docs.microsoft.com/en-us/dynamics-nav/how-to-set-up-a-dynamics-crm-connection
The simple way to know you’re ok with the connection is, on the “Microsoft Dynamics 365 for Sales Connection Setup” the “Version” and “Integration solution Imported” field. They go green after a validated “Test Connection” :

Understand how CRM connector is working
Microsoft is using “Integration” table concept to manage/compare data before integrating them in both synchronization way. Integration tables are used as a buffer between the two systems.
These buffers are organised in two levels
- First one is a pointer on modified/created RecordID identified as integrable :
Table 5331 CRM Integration Record filled with CRM records
Table 5151 Integration Record filled with Nav records - Second one is concret representation of CRM data structure. The connector need to have the CRM table metas in Nav to handle the data (Don’t ask me why Microsoft made this and don’t manage to code it dynamicly)
Data integration flow
- From Nav to CRM
Nav modification/creation -> Nav generic event subscrider -> Table 5151 Integration Record -> Mapped CRM integration table -> Nav Job queue
- From CRM To Nav :
CRM modification/creation -> Nav Job queue -> Table 5331 CRM Integration Recors -> Mapped CRM integration table -> Mapped Nav table
The connector also provide a coupling system
If you enable this for a table mappings, only coupled records will be synchronized and nav will provide you an action button to manage the record coupling from his card page (to add couoling capacity on custom table you should add theses function following Microsoft doc here)
Modify or add a custom table mappings
Microsoft strategy is to disable any modifications through page “Integration Table mappings” and “Integration field mappings”. This avoid any modification from a not technical user I guess. Solution give by Microsoft to modify the mapping is to open tables (5335, 5336) from Nav developement environement.
Another solution is to modify the default mappings setup code explain in Step 2. It allow you to build the mapping, create the job queue and enable synchronisation for existing records. This is not automatic with previous solution. It’s also avoiding the need of export/import mappings setup if we want to put it in another Nav base.
Step 1 – Get a the CRM table structure for Nav integration
Use the powershell cmdlet : New-NavCrmTable
(here detailed info of this cmdelet)
Important point is to use the cmdlet including all CRM entities related to the custom table you want. The minimum relation is systemuser (for ModifiedBy/CreatedBy fields that are alway present in CRM entities).
You can use following powershell and add your custom table in it :
$CRMserver = "https://MyCompany.crm4.dynamics.com"
$username = "MyUser@MyCompany.onmicrosoft.com"
$password = "MyPassword"
$Output = "C:\Users\ME\Desktop\Nav-CRM-Tables"
$Credential = New-Object System.Management.Automation.PSCredential($username, ($password | ConvertTo-SecureString -asPlainText -Force) ) #$password)

New-NAVCrmTable -CRMServer $CRMserver -EntityLogicalName systemuser,account,contact,opportunity,transactioncurrency,pricelevel,product -Name "CRM Systemuser","CRM account","CRM contact","CRM Opportunity","CRM Transactioncurrency","CRM Pricelevel","CRM Product" -ObjectId 5340,5341,5342,5343,5345,5346,5348 -OutputPath $Output -Credential $Credential -Force
If all run good you will have your .txt in the specified folder that you can import in Nav. If related entities are already in Nav (like CRM Systemuser) it’s not necessary to reimport it. Be careful, this cmdlet is case sensitive.
In case of missing field in the generated CRM table, it is because you didn’t put all related CRM Entities in the cmdlet.
Step 2 – Modify default mappings
To add, remove or modify a table or field mappings, go to Codeunit 5334 CRM Setup Default
The principal method is ResetConfiguration() who call other ResetXXMapping methods for each table mapping. Example under.
We can easly play with those who already exists to remove or change fields mappings. To add new table mapping simply copy one of ResetTableMapping function and adapt to your new table, previously downloaded with the powershell cmdlet.

At the end you can add the job queue creation for automatic synchronisation :
RecreateJobQueueEntryFromIntTableMapping(IntegrationTableMapping, 30,TRUE );
Another important point is on existing record in Nav table before the connector activation. These records would not be synchronised until they are manually coupled or modified. You can automaticly force them to be synchronised with the small bellow code :
// Fill the Integration Record table
MyNavRecord.RESET;
IF MyNavRecord.FINDFIRST THEN
  REPEAT
    MyNavRecord.MODIFY(TRUE);
  UNTIL MyNavRecord.NEXT = 0;
This code will trigger the CRM connector update verification code and fill the Integration Record table, if the table mappings is on synch. all or if the record is coupled.
Step 3 – Transform/process data before integration
If you have to modify or do any process on Nav or CRM data before integrating it, simply create a new method subscride to a codeunit 5345 Integration Rec. Synch. Invoke event.
You have lot of exemple in code unit 5341 CRM Int. Table Subscrider, like the exchange rate calculation on currency synch. with the “OnAfterTransferRecordFields” event.
More details on Microsoft doc here
Step 4 – Synchronise
You can now reset to default synchronization to get your changments applies.
/!\ Be careful, deleted table mappings from default will stay in the mapping and have to been deleted manualy

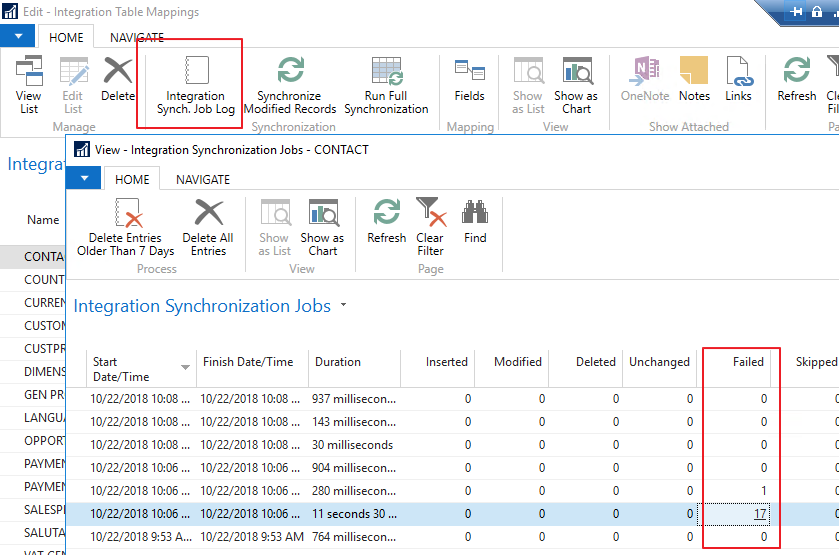
To handle any synchronization error, open the particuclar table mappings and check Integration Synch. Job Log. If any error occur you can click on the counter to have details. If job queue didn’t launch immediatly you can force a “Run Full Synchronization” manually from the table mappings page.